Use LXC containers on Ubuntu
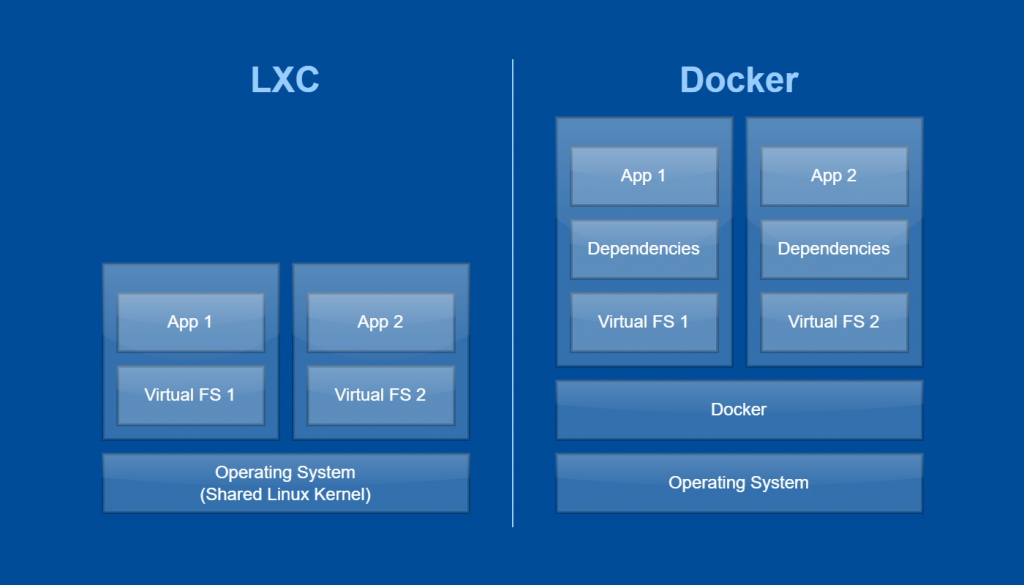
The first technology most people think when discussing containers is Docker, but that’s not the only one. Linux Containers (LXC) are about 10 years older than Docker and were originally the backbone of Docker until Docker built its own container runtime. LXC containers are best used to create lightweight virtualized operating system environments, such that multiple apps can run on a single Linux system isolated from one another. The difference between LXC and Docker specifically, is that LXC is closer to the operating system since all containers share the host kernel.
On the other hand, Docker was made with development in mind, wrapping an application and all its dependencies into a container that could be run on any operating system.
Install LXC on Ubuntu
For this tutorial I’ll be using Ubuntu 24.02.2 LTS installed on Windows 11 using Windows Subsystem for Linux. If you don’t know, this is a full Ubuntu install using Hyper-V technology allowing us to connect to the VM using Powershell on a Windows workstation.

To install LXC on Ubuntu, run the following as root:
# apt update
# apt install lxc -y
This is all that should be needed to get the needed LXC tools and, according to linuxcontainers.org, python3 as well. The output for this command gave me an error, but if I had to guess I’d say it’s because I’m using WSL. We’ll see if it rears its ugly head again, but for now I’m going to ignore it.
Cache read/write disabled: interface file missing. (Kernel needs AppArmor 2.4 compatibility patch.)
Warning: unable to find a suitable fs in /proc/mounts, is it mounted?
Use --subdomainfs to override.
Failed to run 'apparmor_parser -rWT /etc/apparmor.d/lxc-containers'. You will probably need to run it by hand at some point.
Now let’s check whether the kernel has the required configuration by running:
# lxc-checkconfigIf you see something that isn’t enabled and you run into problems, drop a comment. In my case, all my output looked green and happy with every item listed as “enabled.”
Configure UID and GID Ranges for More Secure Containers
The easiest way to use containers is by creating privileged containers with root. These containers can access the host directly with root permissions, so they are easier to use but they are less secure, and if a container is compromised, then so is the host system. This can be mitigated by using unprivileged containers.
LXC’s getting started guide presents two choices for unprivileged containers. Modify the default.conf so that all unprivileged containers use this same range or make app specific configs that isolate the containers from each other. If the same range is used for different containers, then a compromised container would mean other containers are also compromised. The safer bet is to configure non-overlapping ranges for each container.
I like to do both so that containers are unprivileged by default, but I use different config files to separate permissions
# echo "root:100000:65536" >> /etc/subuid
# echo "root:100000:65536" >> /etc/subgid
Now add an idmap to the /etc/lxc/default.conf file.
# echo "lxc.idmap = u 0 100000 65536" >> /etc/lxc/default.conf
# echo "lxc.idmap = g 0 100000 65536" >> /etc/lxc/default.conf
That’s it. If you were to create a container now, it would be unprivileged by default.
Create a Linux Container Using a Template
A list of template containers can be found at https://images.linuxcontainers.org/. For this exercise we will use Rocky 9.
First add a new uid and gid range to use for our new container(s). Since we changed the default.conf to include a uid and gid range, we want to make sure our new container uses a different range. Check which ranges are already in use
# cat /etc/subuid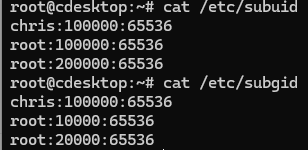
Now add a new range to the subuid and subgid files.
# echo "root:20000:65536" >> /etc/subuid
# echo "root:20000:65536" >> /etc/subgid
Copy the LXC default.conf to a new file with a descriptive name. Any container you create using this conf file will have the same permissions on the host system. This is usefulf or volume mounting and file sharing as we’ll see later.
# cp /etc/lxc/default.conf /etc/lxc/group1.confNow replace the default uid and gid range with the new range in your new conf file. You can use nano here, but sed works too.
# sed -i 's/lxc.idmap = u 0 100000 65536/lxc.idmap = u 0 200000 65536/g' \
/etc/lxc/group1.conf
# sed -i 's/lxc.idmap = g 0 100000 65536/lxc.idmap = g 0 200000 65536/g' \
/etc/lxc/group1.conf
Now create the container using a template.
# lxc-create --config /etc/lxc/group1.conf --name container1 \
--template download -- --dist rockylinux --release 9 --arch amd64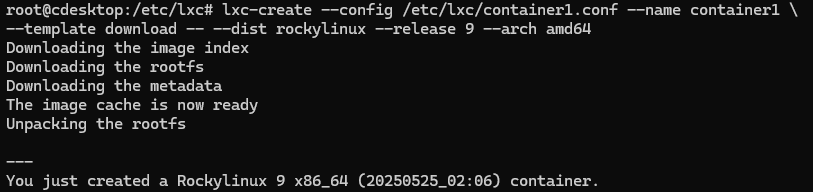
Interacting with LXC containers
Start the container.
# lxc-start --name container1If everything went well, there will be no feedback. Start the container’s shell by attaching to it.
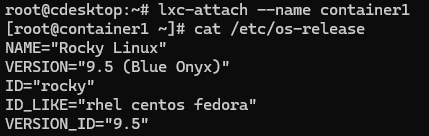
# lxc-attach --name container1You’ll notice that this is now a virtualized Rocky install on our Ubuntu host.
Use # exit to get out of the container. The container continues running. You can list containers and their state.
# lxc-ls --fancy
Configuring LXC Containers
Autostart an LXC container
Containers do not autostart by default. You can modify the files in /etc/lxc/ to set newly created containers to autostart.
# echo "lxc.start.auto = 1" >>/etc/lxc/group1.conf
You can also set autostart on already created containers.
# echo "lxc.start.auto = 1" >>/var/lib/lxc/container1/config
Configure an IP Address
You may have noticed the IP address listed by lxc-ls command above. Each time the container is started it is assigned an IP address via dhcp. If your container will be hosting an appolication, you may want a consistent IP address, in which case you must enable dhcp reservations for your LXC containers. Uncomment LXC_DHCP_CONFILE line in /etc/default/lxc-net on the host and specify a path to the dnsmasq.conf file we want to modify.
# sed -i 's|^#LXC_DHCP_CONFILE=.*$|LXC_DHCP_CONFILE=/etc/lxc/dnsmasq.conf|' /etc/default/lxc-netYou can Now add IP reservations.
# echo "dhcp-host=container1,10.0.3.100" >>/etc/lxc/dnsmasq.conf
Restart the network service and container for changes to take effect.
service lxc-net restart
lxc-stop --name container1
lxc-start --name container1
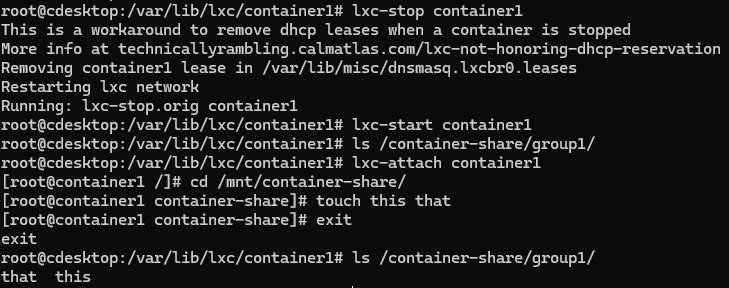
Stopping the container is supposed to remove the leases, but I’ve found in my case that lxc does not honor DHCP reservations when a container is restarted. The leases did go away after a host reboot. You can check current leases by checking dnsmasq.lxcbr0.leases file.
$ cat /var/lib/misc/dnsmasq.lxcbr0.leasesNow that your container has an IP address you can connect to it from the host machine. If you want to access the guest container from outside the host you can forward packets with iptables to map a host port to a container port.
Mount a Host Directory Inside the LXC Container
First create a directory that will be used as the mount target and give your container’s uid and gid permissions.
# mkdir -p /container-share/group1
# chown 200000:200000 /container-share/group1
Now add a line to the container’s config with the fstab syntax. Use a relative path for your container’s path, or use the rootfs to use the absolute path on the host.
# Mount point
# echo "lxc.mount.entry = /container-share/group1 /mnt/container-share none bind,create=dir 0 0" >>/var/lib/lxc/container1/config
Notice the option “create=dir,” which is an lxc option that will automatically create the directory in the container if it doesn’t already exist.
Now restart your container your mount point should be available.