
Install WordPress to Rocky Linux
In this post I will go over how to install Apache, MariaDB, and PHP to Rocky Linux 8 or Rocky Linux 9 with the intention of hosting a WordPress site on HTTPS with a valid Let’s Encrypt certificate. This includes Apache settings, SELinux config, and firewall commands all in one unattended script.
Pre-install
First update packages
sudo dnf update -y
I recommend you continue to use SELinux, and some of these instructions will require adding contexts and changing settings. The Rocky image on Google Cloud did not come with semanage installed. Semanage on these versions of Rocky comes from the policycoreutils-python-utils package
sudo dnf install policycoreutils-python-utils -y
Install PHP from Rocky’s AppStream Repository
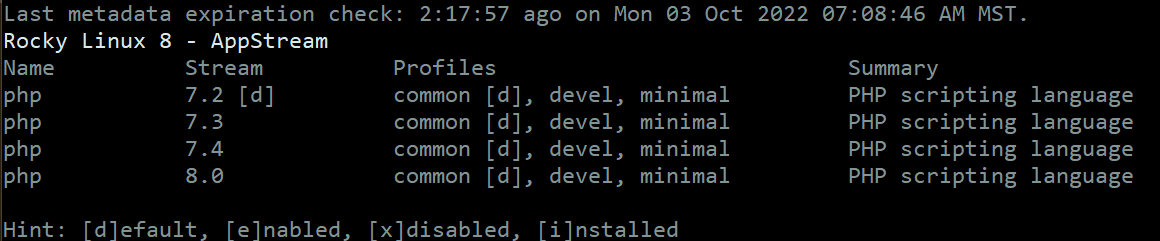
Rocky Linux uses what they call modules for package updates. This allows them to offer different versions of a package from the same repo. At the time of this writing the default version of PHP on Rocky 8 is 7.2 and the default PHP on Rocky 9 is 8. These commands let you see available versions and allow you to set the version you want installed. Alternately, you could use the remi repo, but we prefer to use the AppStream repos where possible to make updating easier.
sudo dnf module list php
sudo dnf module reset php -y
sudo dnf module enable php:8.0 -y
sudo dnf install php php-cli php-json php-gd php-mbstring php-pdo php-xml php-mysqlnd php-pecl-zip -y
Install MariaDB to use with WordPress
MariaDB is an open source relational database made by the original developers of MySQL. You can use the dnf module list command as above if you would like to see available versions. Both Rocky 8 and 9 come with stable versions of MariaDB so let’s just install.
sudo dnf install mariadb-server -y
With MariaDB installed, let’s start it and set it to run at startup.
sudo systemctl enable --now mariadb
Now create a database for WordPress. You might want to look over WordPress docs if you’re going to be installing more than one WordPress site. In this case we’re only going to be using one database so we’re naming it “wordpress”.
sudo mysql --user="root" --execute "CREATE DATABASE wordpress"
We need to create a database user that WordPress uses to connect to the database. This is not a WordPress user, this is a database user. I typically name this something related to the site name, but you can use anything. You will need this user and password to complete the final installation steps for WordPress later.
In the command below pay attention to the quotation marks. Some versions of MariaDB/MySQL require backticks and not single quotes. This versions uses single quotes just fine. Replace “wordpress” below with the name of you database in quotes. Notice the ‘some_user_name’@’localhost’ syntax and ‘SOMEPASSWORD’ in single quotes. The quotes are important.
In this case I used wordpress as the database, wp_user as the user, and randomly generated a password. Remember to change those things below before you run the command.
sudo mysql --user="root" --database="wordpress" --execute="CREATE USER 'wp_user'@'localhost' IDENTIFIED BY 'SOMEPASSWORD'"
Now we’re going to give the user access to the WordPress database. If the WordPress instance is compromised we don’t want an attacker to have root access to the database, so we do not give WordPress root creds.
sudo mysql --user="root" --database="wordpress" --execute="GRANT ALL ON wordpress.* TO 'wp_user'@'localhost'"
sudo mysql --user="root" --database="wordpress" --execute="FLUSH PRIVILEGES"
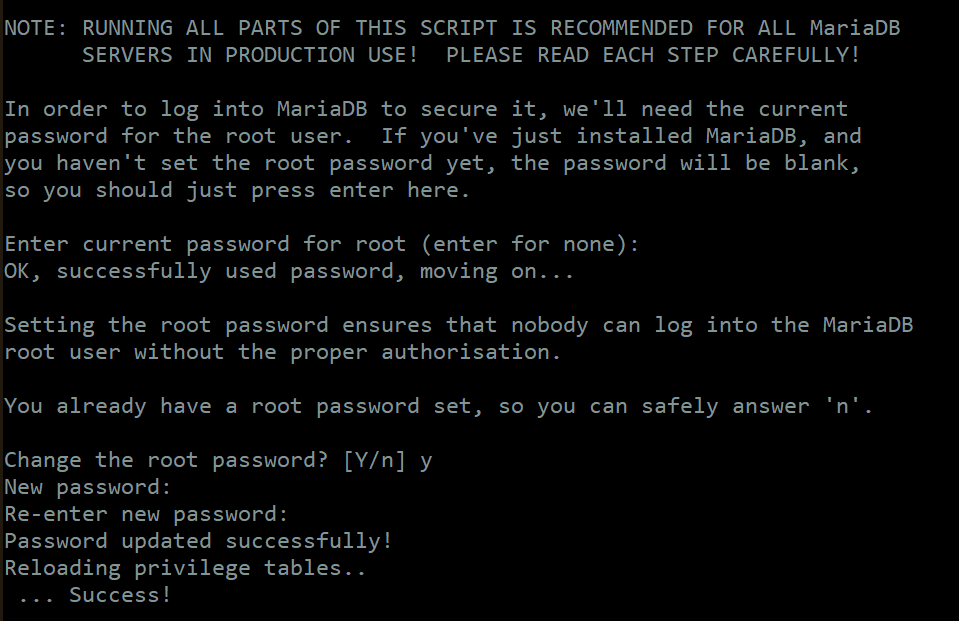
With the database setup and ready to go, run the following command to harden the security of the database. Specifically, you should disable anonymous users, disable remote login by root, and delete the test databases that come with a clean install. You will need to enter a password here. It should not be the same as the wp_user password above. Run the command and follow the prompts.
sudo mysql_secure_installation
Installing the Webserver
Your server might have already come with Apache installed. Alternately, you could substitute the Apache instructions below for nginx instructions if you’re worried about performance. The Google Cloud image of Rocky 9 had Apache installed, but not the SSL module. Run the command below to get the packages you need. If you already have the packages, running these commands won’t break anything.
sudo dnf install httpd mod_ssl -y
If the server is already running, the following command will fail, but we’re going to restart the server later anyway, so let’s not worry too much about that and just run the command.
sudo systemctl enable --now httpd
Setting Firewall Rules to Allow WordPress on Rocky Linux
After the command above you should be able to go to your webserver’s IP address or DNS name and get a Rocky welcome page, but it’s likely that your firewall is blocking requests. To allow http and https on Rocky issue the commands below and then try again.
sudo firewall-cmd --permanent --add-service=http
sudo firewall-cmd --permanent --add-service=https
Adding WordPress Files and Using Apache with SELinux
Download the latest WordPress install using curl or wget.
curl https://wordpress.org/latest.tar.gz --output ~/wordpress.tar.gz
Extract the WordPress files to the apache directory. The tarball from WordPress has a single folder in it called wordpress and all the relevant files are in there. We need to change the name of that extracted folder to match the config file that we’ll make later.
sudo tar xzvf ~/wordpress.tar.gz -C /var/www/html
sudo mv /var/www/html/wordpress /var/www/html/technicallyrambling
We need to give the Apache service read/write to the WordPress folder. There’s some internet argument that root should retain ownership of web files so that a compromised Apache server doesn’t trash the directory structure. If you would like to harden your server a bit, you can determine which folders truly require write permissions by Apache and go from there. If you were hosting a static site site, keeping the files root owned would be a good idea. In either case, the attacker shouldn’t get any more access than these directories, as long as the Apache service is not running as root. By default, it does not run as root.
sudo chown -R apache:apache /var/www/html/technicallyrambling
We don’t need files to be executable but we do need directories to be executable, and we want everything in our wordpress folder to be writeable by user and group. With that in mind, there’s two commands. The commands find by type and apply permissions.
sudo find /var/www/html/technicallyrambling -type d -exec chmod 775 '{}' \;
sudo find /var/www/html/technicallyrambling -type f -exec chmod 664 '{}' \;
The SELinux contexts are missing for our new files, so let’s add the contexts using a wildcard. Change your directory name to match your environment.
sudo semanage fcontext -a -t httpd_sys_rw_content_t "/var/www/html/technicallyrambling(/.*)?"
The contexts are added, but not applied yet. The following command requires an absolute path.
sudo restorecon -Rv /var/www/html/
Create a VirtualHost for your WordPress Site
Apache’s default configuration on Rocky Linux will look for configuration files in the /etc/httpd/conf.d/ directory. It’s here that we’re going define the connection between your DNS name and the WordPress directory we created. Create a new file in this directory as root, and name it something descriptive. I choose to use the site’s name with no spaces.
sudo touch /etc/httpd/conf.d/technicallyrambling.conf
Now edit the file to match the file below.
sudo nano /etc/httpd/conf.d/technicallyrambling.conf
Remember to change technicallyrambling and technicallyrambling.calmatlas.com below to refer to your website name, not mine.
<VirtualHost *:80>
  ServerName technicallyrambling.calmatlas.com
  Redirect permanent / https://technicallyrambling.calmatlas.com/
</VirtualHost>

<VirtualHost *:443>
  ServerName technicallyrambling.calmatlas.com

  ServerAdmin root@localhost
  DocumentRoot /var/www/html/technicallyrambling
  ErrorLog /var/log/httpd/wordpress_error.log
  CustomLog /var/log/httpd/wordpress_access.log common

  <Directory "/var/www/html/technicallyrambling">
    Options Indexes FollowSymLinks
    AllowOverride all
    Require all granted
  </Directory>

  SSLCertificateFile /etc/pki/tls/certs/localhost.crt
  SSLCertificateKeyFile /etc/pki/tls/private/localhost.key
</VirtualHost>
Since we created the file above with sudo touch, it should have inherited the right type and have the correct SELinux user, but for posterity’s sake, here are the SELinux commands needed.
sudo semanage fcontext -a -t httpd_config_t -s system_u /etc/httpd/conf.d/technicallyrambling.conf
sudo restorecon -Fv /etc/httpd/conf.d/technicallyrambling.conf
Finally, reset Apache and cross your fingers. If you did everything right above, the httpd service will stop, then start again without giving an error or information.
sudo systemctl restart httpd
If you receive an error, you might get some info from the /var/logs/httpd. Even if the service started, your WordPress instance won’t be happy until you have a certificate installed as outlined below.
Deploy a Let’s Encrypt Certificate to the WordPress Site
Before you move on make sure that you have properly configured your DNS settings. If you cannot get to your website by URL, like https://www.yoursite.com/ DO NOT PROCEED. TLS Certificates make use of DNS and rely on your URL resolving to your website.
So far everything we’ve installed has come from the default AppStream repository provided by Rocky Linux. Let’s Encrypt can be installed from the Extras repository. We will install the repo, then the tools.
sudo dnf install epel-release -y
sudo dnf install certbot python3-certbot-apache -y
The following command will issue your first cert and on Linux will automatically renew your cert when necessary. Remember to put your email address and domain address in the command below.
sudo certbot --apache --non-interactive --agree-tos -m [email protected] --domain technicallyrambling.calmatlas.com
Final Touches and some Security Stuff
The plugin and themes installer don’t work after install, and if you dig around the logs you find that this can be corrected with the following command
sudo setsebool -P httpd_can_network_connect 1
The configuration file we made earlier accepts connections via domain name, but if a user were to connect to our server with an IP address or some other DNS record not defined as a VirtualHost, then they get a Rocky welcome page. This file needs to be commented out to disable the page. If you delete the file instead of commenting, the file is restored on next update.
sudo sed -i'' 's/^\([^#]\)/#\1/g' /etc/httpd/conf.d/welcome.conf
If a user goes to a directory on your webserver with an index.php or index.html file does not exist, that user gets a listing of the directory content. This is not ideal. Disable this feature by removing the “Indexes” option from httpd.conf
sudo sed -i'' 's/Options Indexes/Options/g' /etc/httpd/conf/httpd.conf
That’s it
The last step is to navigate to your website. You will be greeted with a setup page that asks for the username and password that was set up earlier.
Script to Install LAMP Stack and WordPress on Rocky Linux
The script below can be found on github. I offer no warranty. I strongly encourage you to snapshot your server prior to running any scripts. Variables need to be adjusted to match your environment. I’m open to criticism and enjoy problem solving, so hit me up on Discord if you have tips or need tips.
# This scripts gets a wordpress site up and running with valid ssl certs from letsencrypt at the given FQDN.

# Incomplete instructions and inspiration found here: https://linuxways.net/red-hat/how-to-install-wordpress-on-rocky-linux-8/
# This script orginally written and tested on Rocky 9 GCP Optimized (Google Cloud Compute e2 medium instance)
# Additionally tested and modifed to work with Rocky 8 GCP Optimzed (Google Cloud Compute e2 medium instance)
# Pre-req - Valid dns record configured to point to this server
# Pre-req - Server needs internet access

# variables
SITENAME="technicallyrambling"
DOMAIN="calmatlas.com"
# email address needed for letsencrypt, if you comment the last part of this
[email protected]

FQDN="$SITENAME.$DOMAIN"
WP_USER=wp_$SITENAME
WP_DB=wp_$SITENAME

# First update packages
sudo dnf update -y

# Rocky 8 on Google Cloud did not come with semanage installed. semanage comes from the policyutils-python-utils package
sudo dnf install policycoreutils-python-utils -y

#-----------------------------------------------------#
# php
#-----------------------------------------------------#
# The instructions from linuxways.net tell you to "reset the default php 7.2" without describing why or what that is.
# The default appstream repo on a fresh install of rocky 8 will have php 7.2. At the time of this writing, the latest supported version is 8.
# If we needed the latest and greatest we'd install the remi repo here. As of this writing Rocky 9 defaults to PHP 8, while Rocky 8 defaults to PHP 7.2
# TODO - Check for current version and get it.

# Rocky 8 defaults to php 7.2 while rocky 9 defualts to php 8.  I won't be suing remi repos
# Set php 8 as desired version from appstream repo. These commands will fail on fresh install of rocky 9
sudo dnf module reset php -y
sudo dnf module enable php:8.0 -y

# Rocky 9 already has php 8 so let's just install from the appstream repo
sudo dnf install php php-cli php-json php-gd php-mbstring php-pdo php-xml php-mysqlnd php-pecl-zip -y

#----------------------------------------------------#
# Database
#----------------------------------------------------#
# install mariadb
sudo dnf install mariadb-server -y

# start and enable the mariadb
sudo systemctl enable --now mariadb

# Remove the mysql root password first if it exists. This is to allow the script to run more than once.
# To install a second instance of wordpress on the same server, for example. The root password will be changed
# There's probably a better way to do this.
sudo mysql --defaults-file=/root/wp_root.pass --execute="ALTER USER 'root'@'localhost' IDENTIFIED BY ''"

# Create a databsae
sudo mysql --user="root" --execute "CREATE DATABASE $WP_DB"

# Create random password for the wordpress user - You'll need this later and will see it on script run.
wp_db_user_pass=$(< /dev/urandom tr -dc _A-Z-a-z-0-9 | head -c32;echo;)

# Create the user
sudo mysql --user="root" --database="$WP_DB" --execute="CREATE USER '$WP_USER'@'localhost' IDENTIFIED BY '$wp_db_user_pass'"

# Grant the user privileges
sudo mysql --user="root" --database="$WP_DB" --execute="GRANT ALL ON $WP_DB.* TO '$WP_USER'@'localhost'"
sudo mysql --user="root" --database="$WP_DB" --execute="FLUSH PRIVILEGES"

# We should improve the security of the mariadb installation, the following command promps the user with questions
# sudo mysql_secure_installation

# The mysql_secure_installation is just a bash script. We can accomplish the same thing with the following lines
# Remover anonymous users
sudo mysql --user="root" --execute="DELETE FROM mysql.user WHERE User=''"
# allow root login from localhost only
sudo mysql --user="root" --execute="DELETE FROM mysql.user WHERE User='root' AND Host NOT IN ('localhost', '127.0.0.1', '::1')"
# delete test database
sudo mysql --user="root" --execute="DROP DATABASE IF EXISTS test"
sudo mysql --user="root" --execute="DELETE FROM mysql.db WHERE Db='test' OR Db='test\\_%'"

# Generate a root password and save to a file
sudo sh -c 'wp_db_root_pass=$(< /dev/urandom tr -dc _A-Z-a-z-0-9 | head -c32);
cat > /root/wp_root.pass << EOF
[client]
user=root
password=$wp_db_root_pass
EOF'
sudo chmod 400 /root/wp_root.pass

# Set root password
sudo mysql --user="root" --execute="ALTER USER 'root'@'localhost' IDENTIFIED BY '$wp_db_root_pass'"
sudo mysql --user="root" --password="$wp_db_root_pass" --execute="FLUSH PRIVILEGES"

#----------------------------------------------------#
# Webserver and wordpress files
#----------------------------------------------------#
# Install apache and mod_ssl for 443
sudo dnf install httpd mod_ssl -y

# enable apache server
sudo systemctl enable --now httpd

# Download the latest worpdress
curl https://wordpress.org/latest.tar.gz --output ~/wordpress.tar.gz

# Extract the wordpress files to apache directory
sudo tar -xzf ~/wordpress.tar.gz -C /var/www/html
sudo mv /var/www/html/wordpress /var/www/html/$SITENAME

# give apapche ownership to wordpress
sudo chown -R apache:apache /var/www/html/$SITENAME

# set permissions to wordpress
sudo chmod -R 775 /var/www/html/$SITENAME

#selinux - give httpd rights to html folder
sudo semanage fcontext -a -t httpd_sys_rw_content_t "/var/www/html/$SITENAME(/.*)?"
sudo restorecon -Rv /var/www/html/

# Create an apache virtual host file to point to the wordpress install
# We're writing it to the home directory of whoever ran the script first
cat > ~/$SITENAME.conf << EOF
<VirtualHost *:80>
  ServerName $FQDN
  Redirect permanent / https://$FQDN/
</VirtualHost>

<VirtualHost *:443>
  ServerName $FQDN

  ServerAdmin root@localhost
  DocumentRoot /var/www/html/$SITENAME
  ErrorLog /var/log/httpd/wordpress_error.log
  CustomLog /var/log/httpd/wordpress_access.log common

  <Directory "/var/www/html/$SITENAME">
    Options Indexes FollowSymLinks
    AllowOverride all
    Require all granted
  </Directory>

  SSLCertificateFile /etc/pki/tls/certs/localhost.crt
  SSLCertificateKeyFile /etc/pki/tls/private/localhost.key

</VirtualHost>
EOF

# Move the file we just created and give it the appropriate permissions
sudo chown root:root ~/$SITENAME.conf
sudo mv ~/$SITENAME.conf /etc/httpd/conf.d/

#selinux - label the conf file as a system file.
sudo semanage fcontext -a -t httpd_config_t -s system_u /etc/httpd/conf.d/$SITENAME.conf
sudo restorecon -Fv /etc/httpd/conf.d/$SITENAME.conf

# reset apache
sudo systemctl restart httpd

#----------------------------------------------------#
# Security
#----------------------------------------------------#

# open firewall ports
sudo firewall-cmd --permanent --add-service=http
sudo firewall-cmd --permanent --add-service=https

# Additional selinux rules - files relabeled as needed above
# Without this setting the plugin and theme page does not work
sudo setsebool -P httpd_can_network_connect 1

# Configure letsencrypt for a cert - this requires that your DNS settings are already done.
# Install epel repo
sudo dnf install epel-release -y

# Install certbot
sudo dnf install certbot python3-certbot-apache -y

# Retrieve and install the first cert.
sudo certbot --apache --non-interactive --agree-tos -m $EMAIL --domain $FQDN

# Disable rocky default welcome page
sudo sed -i'' 's/^\([^#]\)/#\1/g' /etc/httpd/conf.d/welcome.conf

# Disable directory browsing
sudo sed -i'' 's/Options Indexes/Options/g' /etc/httpd/conf/httpd.conf

#----------------------------------------------------#
#  Output
#----------------------------------------------------#
# Give username and password
echo ""
echo "Navigate to your site in a browser and use the following information"
echo "Database: $WP_DB"
echo "Wordpress User: $WP_USER"
echo "Password: $wp_db_user_pass"
echo ""
echo "Copy this info. You won't see it again."